
In the previous part, we looked on the Azure DevOps build pipeline and how it can be used to build a software deployable package (Part 1). In this part, I will discuss Azure DevOps tasks for the release pipeline that can be used to upload the software deployable package to a project’s asset library in LCS and to deploy the asset into your LCS environment. Before we start, please make sure that you have done all the prerequisites discussed in the first part. You can find more about Azure DevOps tasks for LCS here
Enable the release system
To enable the release system, a new application registration for Azure DevOps must be created in your organization’s Azure Active Directory. This will allow your Azure DevOps to connect to the LCS environment.
Detailed information about registering application in Microsoft AAD can be found here
https://docs.microsoft.com/en-us/azure/active-directory/develop/quickstart-register-app
You will also need to grant admin consent for users in your organization’s directory.
Go to the Application Registrations in your organization’s Azure Active Directory and click on New registration button. Provide a name for your application. Select supported account types and provide a redirect URI. The selected application type must be Public client (mobile & desktop). For redirect URI, you can use any value.

Now, you must add permission to allow your application to start using Dynamics Lifecycle services. Go to Manage -> API permissions and click on Add a permission button. Then search for Dynamics Lifecycle services. Grant permission for your application to use this API.

And grant admin consent for accounts in your organization’s directory.

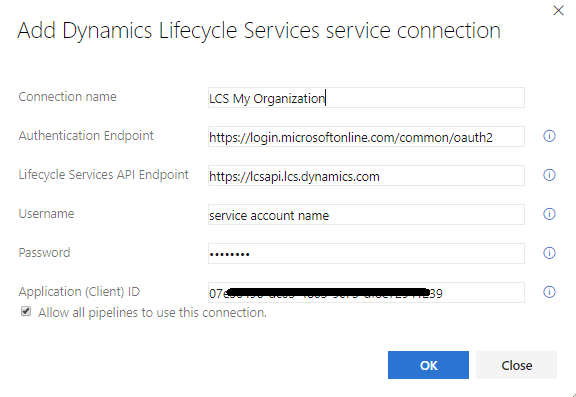
Create a service connection
Go to your project settings in Azure DevOps and select Service connections under the Pipelines node. Click on New service connection button and select Dynamics Lifecycle Services from the list.
Fill in the required properties.
Provide a name for your connection. Leave default values in Authentication Endpoint and Lifecycle Services API Endpoint. Provide a username and password for the connection.
Ensure that the user you will use has access to your LCS project and enough permissions to upload assets to your project’s asset library and deploy it to your LCS environment. Please ensure this user account does not require multi-factor authentication. It is advised to use a service account whose password does not expire and does not require multi-factor authentication.
Release pipeline
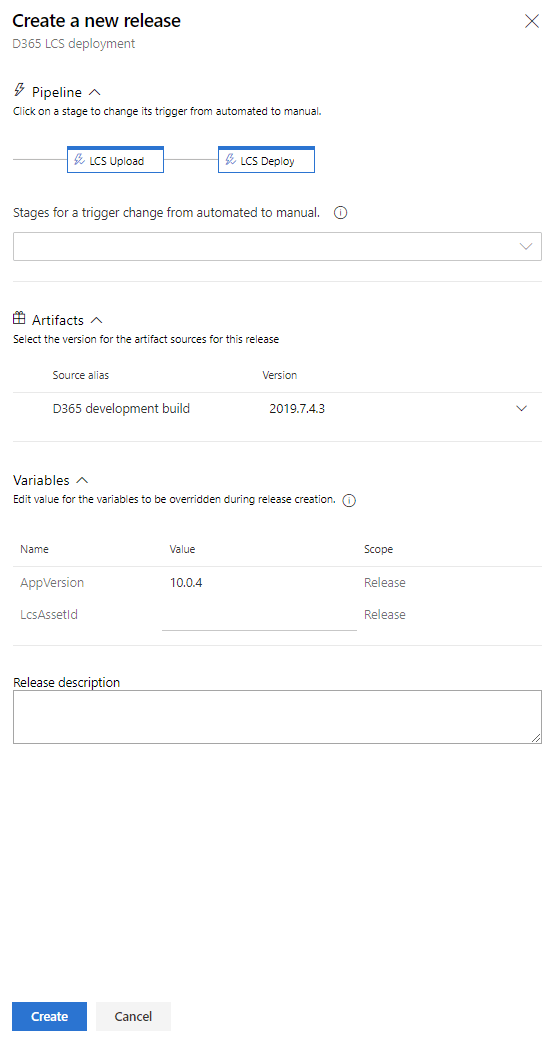
Go to Releases in your Azure DevOps project and create a new release pipeline. I will create a new pipeline that will consist of a single Build artifact and two deployment stages. It is not required to have 2 stages, but it gives me an option to set triggers and approvals for each stage individually. For example, you can set up your deployment stage to require approval from a project user before the stage can start. In this scenario, the first stage contains tasks that you will use to upload the build artifact (the software deployable package) to the asset library in your LCS project. The second stage contains tasks that you will use to deploy the asset to selected LCS environment.
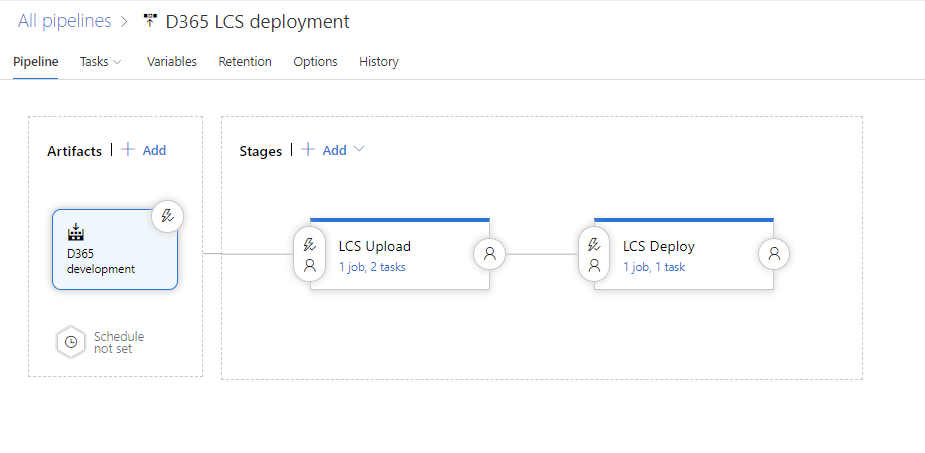
Start by clicking on the New release pipeline button and select an Empty job template.
Setup a build artifact
Click on Add artifact and provide the requested inputs. Select Build as Source type, provide the name of your project and select your build pipeline as the Source. Use Latest as a Default version if this release should be executed automatically. When finished click Add.
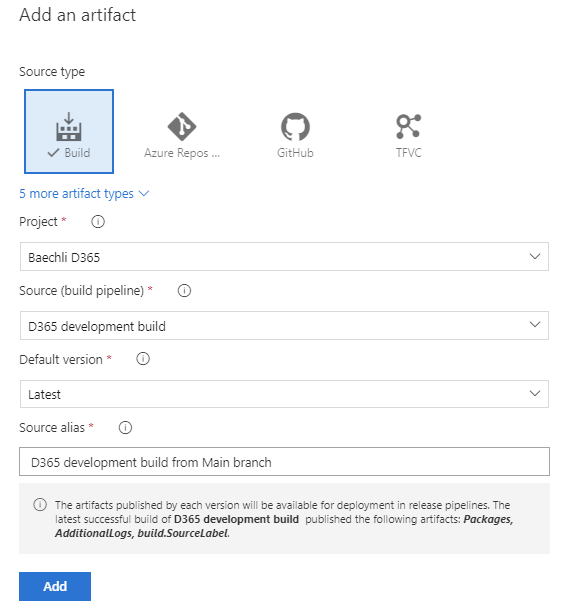
To start the release immediately after the build pipeline ends, you must enable the Continuous integration checkbox from the artifact triggers.
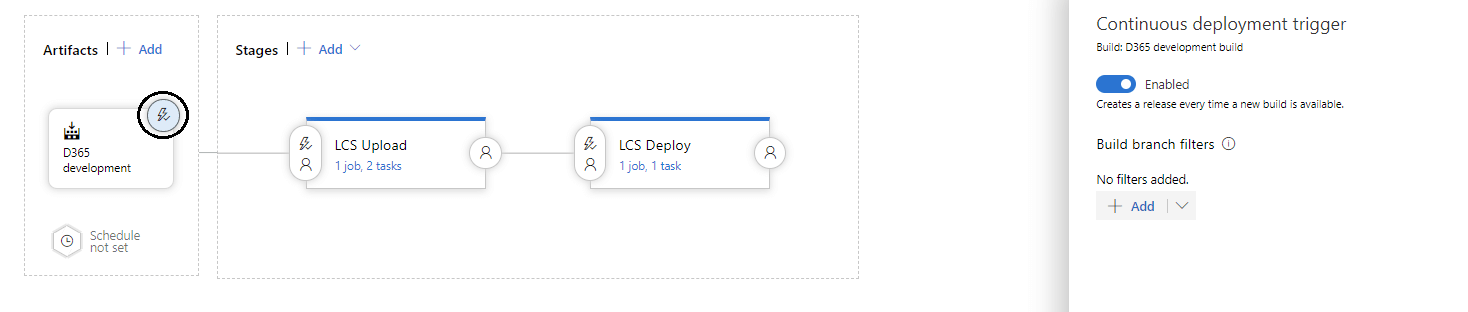
Setup LCS Upload stage
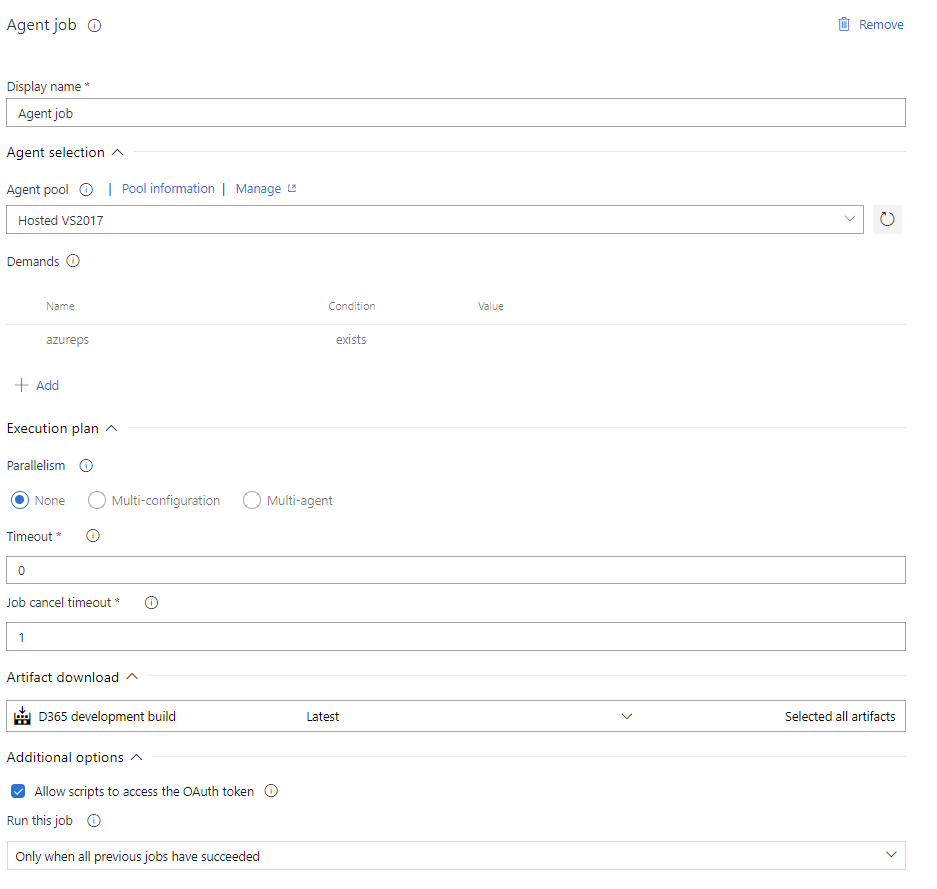
The LCS upload stage consists of Agent job and 2 tasks: LCS Asset Upload and PowerShell script.

The Agent job must run on Microsoft-hosted VS2017 agent. Please note that based on your subscription there can be limits for Microsoft-hosted agents which tells you how many agents you can run in parallel, total minutes for job executions per month and maximum execution time for a single job. I believe that by default Microsoft offers 1 parallel job, in total 1800 minutes/month and maximum 60 minutes execution time for a single job.
Agent job configuration is quite intuitive, just ensure that Allow script to access the OAuth token in Additional options is set.
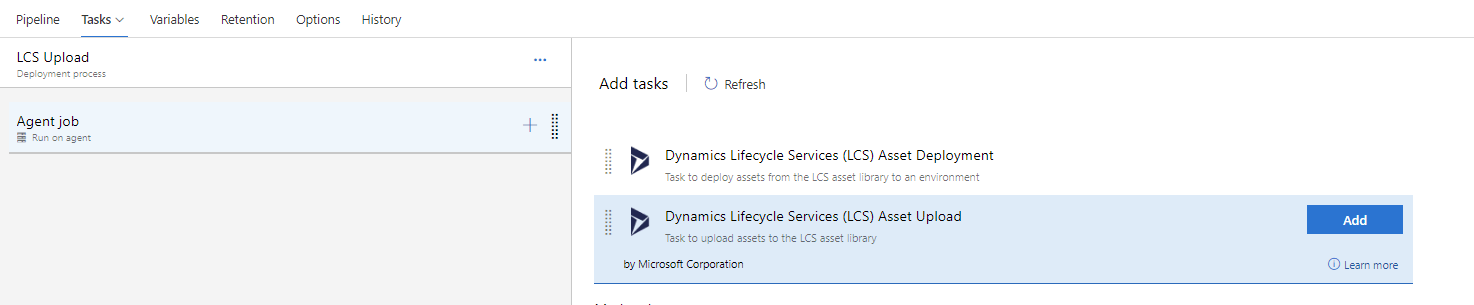
Setup LCS Asset Upload
From Agent job, start by clicking on the Plus button. Search for Dynamics Lifecycle Services (LCS) Asset Upload task and Add.
Fill in the required properties for this task.
Provide a name for your LCS Asset Upload task. Select an LCS connection from your project’s service connections. Provide the LCS Project Id. You can find it in your LCS project URL e.g. https://lcs.dynamics.com/DeploymentPortal/Workspace/1234567
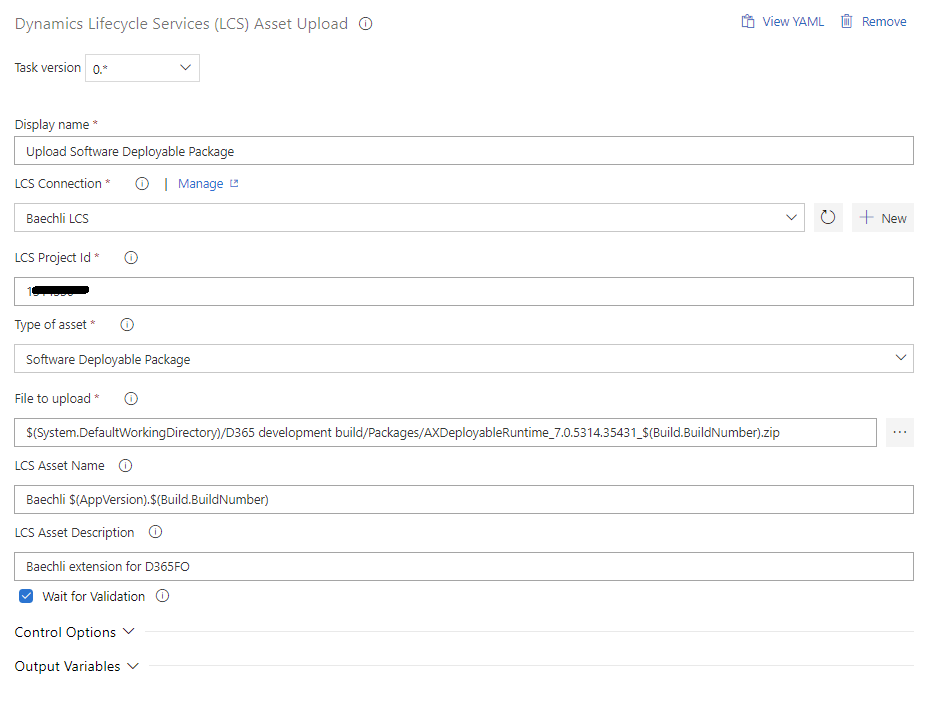
Select Software Deployable package as the asset type. Select your software deployable package from linked artifacts as a value of File to upload property.
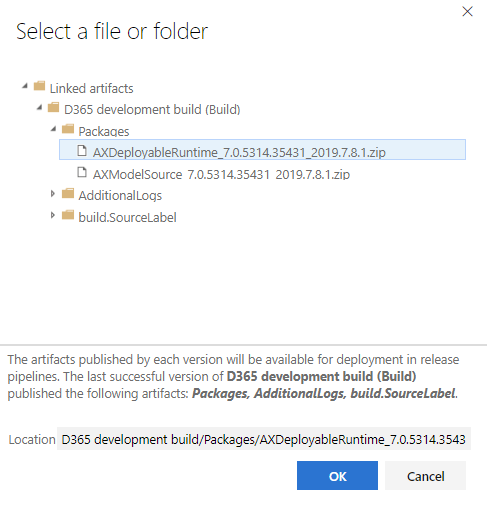
Here you must replace a fixed build version with a Build.
BuildNumber variable this way
AXDeployableRuntime_7.0.5314.35431_2019.7.8.1.zip to
AXDeployableRuntime_7.0.5314.35431_$(Build.BuildNumber).zip
You can use predefined and custom variables to provide a dynamic pattern for LCS Asset Name. You can find more about Release variables here
https://docs.microsoft.com/en-us/azure/devops/pipelines/release/variables?view=azure-devops&tabs=batch
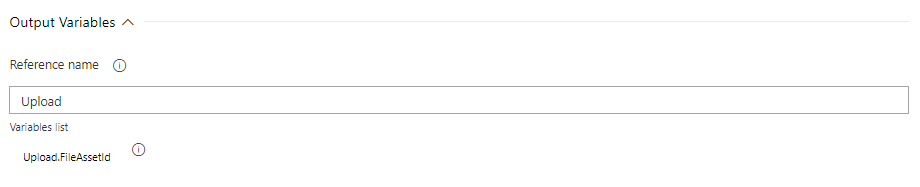
The upload task has an output variable that returns the ID of the asset in the LCS project asset library. Enter a reference name “Upload”. The output variable name must show Upload.FileAssetId.
LCS Asset Id
Please note that this step is required only if you have dedicated stages for LCS Asset Upload and LCS Asset Deployment. If both LCS tasks are at the same stage, you can use Upload.FileAssetId as an input parameter for LCS Asset Deployment and you can skip this part.
I decided to design my release pipeline with 2 stages and thus I must store the output variable Upload.FileAssetId into a custom variable which I prepared for this purpose. I named this variable LCSAssetId.
Go to Pipeline variables and click Add. Name it LcsAssetId and check Settable at release time.

From Agent job, start by clicking on the Plus button. Search for PowerShell task. Provide a name for the PowerShell task and inline the following PowerShell script.
$url = „$($env:SYSTEM_TEAMFOUNDATIONSERVERURI)
$env:SYSTEM_TEAMPROJECTID/_apis/release/releases/$($env:RELEASE_RELEASEID)?api-version=5.1-preview.8“
Write-Host „URL: $url“
$pipeline = Invoke-RestMethod -Uri $url -Headers @{
Authorization = „Bearer $env:SYSTEM_ACCESSTOKEN“
}
Write-Host „Pipeline = $($pipeline | ConvertTo-Json -Depth 100)“
# Update an existing variable named LcsAssetId to its new value based on the Upload.FileAssetId
$pipeline.variables.LcsAssetId.value = $env:UPLOAD_FILEASSETID
####****************** update the modified object **************************
$json = @($pipeline) | ConvertTo-Json -Depth 99
$updatedef = Invoke-RestMethod -Uri $url -Method Put -Body $json -ContentType „application/json“ -Headers @{Authorization = „Bearer $env:SYSTEM_ACCESSTOKEN“}
write-host „==========================================================“
Write-host „The value of Variable ‚LcsAssetId‘ is updated to“ $updatedef.variables.LcsAssetId.value
write-host „==========================================================“
The script was taken from this post
https://www.linkedin.com/pulse/azure-devops-task-deploy-code-micosoft-dynamics-365-ghazvinizadeh/
Setup LCS Asset Deployment stage
Add a new release stage linked it with your LCS asset upload stage. When prompted use Empty job template. Provide a name for your new deployment stage and set up the Agent job the same way you did for the asset upload. Select Hosted VS2017 as the Agent pool.
Setup LCS Asset Deployment
From Agent job, start by clicking on the Plus button. Search for Dynamics Lifecycle Services (LCS) Asset Deployment task.
Fill in the required fields for this task.
Provide a name for your LCS Asset Deployment task. Select an LCS connection from your project’s service connections. Provide LCS Project id and LCS Environment Id. Both Project and Environment Id can be taken from the LCS environment URL e.g.
https://lcs.dynamics.com/V2/EnvironmentDetailsV3New/1234567?EnvironmentId=aaaaaaaa-bbbb-cccc-dddd-eeeeeeee&IsCloudEnvironment=true&IsDiagnosticsEnabledEnvironment=true
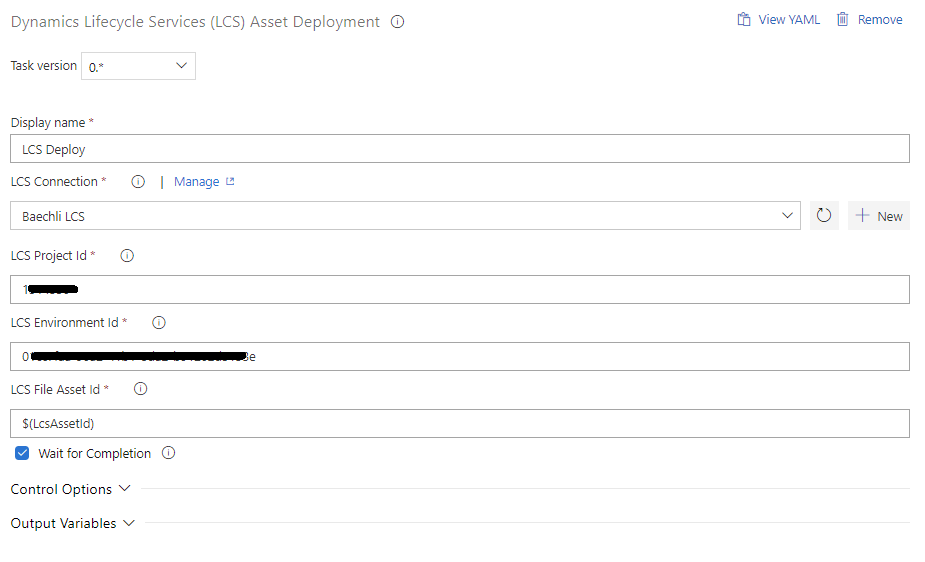
Based on the design of your release pipeline, use either $(Upload.FileAssetId) or $(LcsAssetId) variable as a value for “LCS File Asset Id” field.
Setup release security
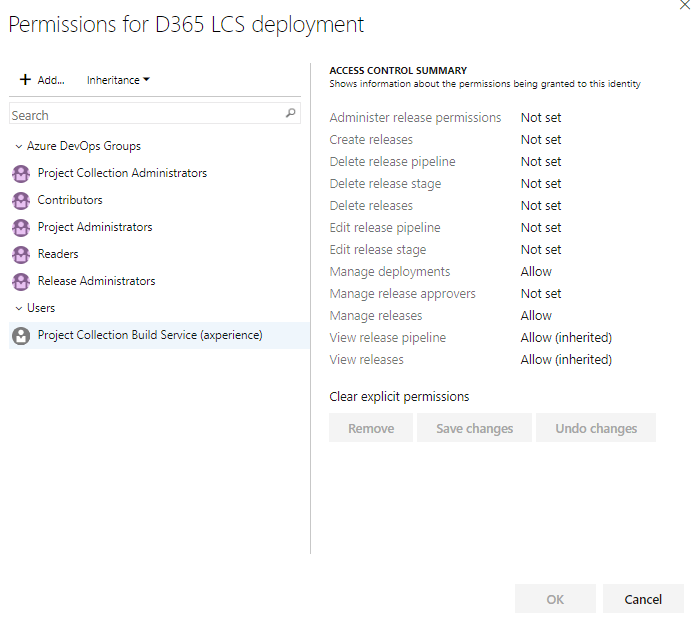
Finally, you must set permissions for Project Collection Build Service. Select your release pipeline in Pipelines -> Releases and go to Security options. Set Manage releases: Allow.
Conclusion
Now, you should be able to create a new release on which end the package should be successfully delivered to the selected LCS environment.
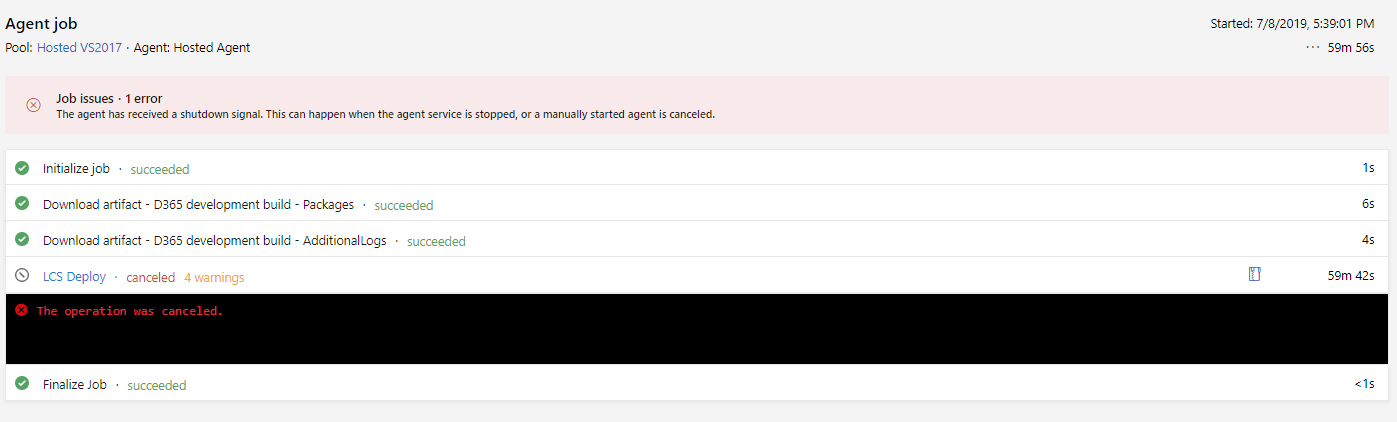
Please note that due to agent limits on Microsoft-hosted agent pools the deployment task may fail. It happens quite often in case of LCS Asset Deployment task which may easily exceed 60 minutes limit for single job execution. The release in DevOps will be shown as canceled. It does not cancel LCS deployment though, it will proceed and eventually end.
Thank you for your time reading this. In a future post, I would like to discuss Azure DevOps Notifications and Service hooks which give you an opportunity to inform project users about various events triggered by Azure DevOps actions.